Greetings to all aspiring wildlife photographers keen on stepping into the realm of red deer (Cervus elaphus) photography. In this blog post, we'll go over the meticulous steps and considerations necessary to capture the grandeur of these creatures, particularly in Central Europe where their skittish nature due to hunting adds to the challenge.

Stag roaring (Nikon D750, Tamron 150-600mm f/5.6-6.3 [@600mm], 1/2000, f/8, ISO 8000, 1:12pm in September)
Understanding the Terrain and Deer Habits
The journey begins with identifying a habitat known for deer presence. While roe deer are frequently seen in agricultural areas such as wheat fields or large meadows with little to no cover, red deer tend to avoid these open habitats, preferring the seclusion of forests and their peripheries. In the case of Hungary, the mid-mountain ranges like Vértes and Bakony are well-inhabited by herds of red deer. Tracks and trails are the first indicators of deer activity; these animals are creatures of habit, often traversing the same paths at different times of the day. The trails, beaten down and marked by hoof prints and the occasional cluster of droppings, are your map to their world. It's beneficial to walk these trails, noting the signs of frequent deer activity, and record your findings. A GPS tracker is an excellent tool for this purpose, and plotting your paths on applications like Google Earth can help you visualize the deer's movements across the landscape.


See above images about deer trail, footprint and droppings on trail (mobile photos)
Camouflage and Stealth
The art of blending in cannot be overstated. Opt for full camouflage – a suit, mask, cap, and gloves to cover any exposed skin. It's a good idea to mix various camouflage materials with different patterns. The less human you appear, the closer you'll get to observing the natural behavior of these magnificent beasts.


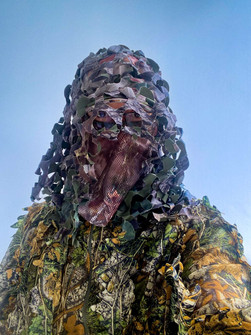
Full body camo clothing; camo head cover and suit, combining different materials (mobile photos)
Movement and Observation Techniques
In your camo attire, you must learn the skill of silent movement. Deer are sensitive to sound, so your approach should be as unobtrusive as a whispering breeze. While walking along the tracks continually scan the environment, not just in front of you, but also to the sides. As you become more attuned to the forest, you’ll start recognizing signs of deer presence – perhaps the rustling of leaves or a distant breaking of twigs. If you even smell the deer it means you are only a few meters away. Upon sensing a deer, remain as motionless as possible. If you are spotted, the deer will be on high alert; hold your position and let the deer settle back into a state of calm. With patience, they may disregard you as a non-threat. If they do bolt, resist the urge to photograph. A fleeing deer results in poor images, and more importantly, it's a sign of a disturbed animal which is best left alone.

Camo clothing and freezing saved the moment: stag noticed something unusual, but could not identify the human (Sony A7III, Sony FE 200-600 F5.6-6.3 G OSS [@379mm], 1/320, f/6.3, ISO 2000, 5:47pm in September)
Timing and Patterns
It’s advisable to track the same paths at varying times. Deer, especially in hunted areas, tend to be active during the twilight hours. Yet, you might be fortunate during late mornings or early afternoons if luck is on your side. Repeatedly walking the trails will reveal preferred spots where deer congregate – small clearings or gentle slopes with fewer obstructions are often their chosen grazing grounds. As a matter of animal behaviour parks in cities like London or Hamburg offer a different perspective, as the deer there are accustomed to human presence and can be observed even during the day.
Trail Cameras for Added Insights
For those seeking to understand deer in their absence, trail cameras are a prudent investment. Moderately priced basic models (40-50 US$) with motion detection and infrared capabilities are usually sufficient. Place these cameras strategically along active trails, attached securely to trees, ensuring they are inconspicuous to passersby. Recommend to set them to capture a burst of 3 photos followed by a short video upon detecting movement. Over time, these cameras will accumulate a wealth of information about the deer's habits and the timings of their movements. On the territories I frequent, my trail cameras have captured not only red deer but also mouflons, foxes, wild boars, black woodpeckers, and badgers, providing excellent inspiration for the next photographic project.


A common type of trailcam; trail cam fixed to a tree along a deer trail facing an open area (mobile photos)

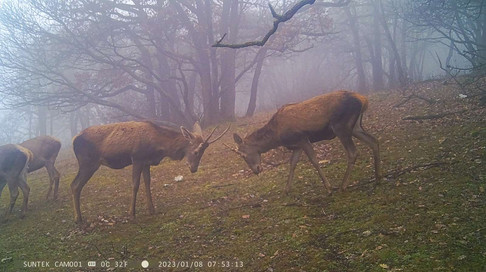


Trail cam photos at daytime (deers) and during the night (mouflon)
Analyzing and Choosing Spots
With the data collected from your trail cameras and personal tracking, you can pinpoint the best locations for photography. Look for areas where deer are frequently seen and where the environment is conducive to photography – with minimal visual obstructions and appropriate distance from the subject.

Peaceful grazing (Sony A7III, Sony FE 200-600 F5.6-6.3 G OSS [@456mm], 1/125, f/7.1, ISO 12800, 8:57pm in Jun)
Photography Equipment
Your choice of camera and lens is crucial. While DSLR cameras are capable of excellent image quality, mirrorless cameras have an advantage in stealth with their silent shutter mode. For red deer, particularly active during dawn and dusk, a full-frame camera with a high ISO performance is recommended to cope with the low light conditions. Opt for telephoto zoom lenses within a 100-800mm focal length range to give you flexibility. Good choice is the common 100-400, 150-500, 150-600 or 200-600mm glass from Canon, Nikon, Sigma, Tamron or Sony. I would not recommend fixed focal length lenses for stalking photography; they are better suited for shooting from a hide at a fixed distance. Brightly colored lenses can be disguised with camouflage tape or neoprene covers to prevent drawing attention.

Mom with kid (Sony A7III, Sony FE 200-600 F5.6-6.3 G OSS [@559mm], 1/500, f/6.3, ISO 25600, 8:23pm in May)

Roaring stag (Sony A7III, Sony FE 200-600 F5.6-6.3 G OSS [@600mm], 1/200, f/6.3, ISO 25600, 6:47pm in September)
Incorporating the art of camera settings with the knowledge we've shared can significantly elevate your wildlife photography. While subjects like landscapes, macro shots, and portraits can be quite forgiving, with the use of aperture priority to manage depth of field, the dynamic nature of wildlife requires a keener focus on managing shutter speed and ISO to capture animals in motion with minimal noise.
Embarking on wildlife photography need not be an expensive endeavour. My personal toolkit, which balances cost with performance, comprises of the Sony A7III or A7IV body paired with the Sony FE 200-600mm f/5.6-6.3 G OSS lens. This combination offers a formidable range and image quality, perfect for capturing the nuances of nature without causing a dent in your finances.
While the allure of top-tier cameras like the Sony A1 or the groundbreaking A9III is undeniable, their higher price point doesn't guarantee success. The true essence of photography lies not in the cost of your equipment but in your familiarity and experience with your gear, as well as your understanding of the subject. It's the photographer's skill and knowledge that turns a moment in nature into a work of art, not solely the camera in their hands.
I've honed my settings to ensure swift adaptability and high-quality results. Here's a guide to setting up your camera, adaptable to other brands as well.
Optimal Camera Settings for Wildlife Photography
Image Quality: Always shoot in RAW for the highest level of detail and post-processing flexibility.
Mode: Manual, to have complete control over exposure settings.
Shutter Speed: Start at 1/400 sec, using electronic (silent) mode to avoid startling wildlife, adjusting with the Rear Left Dial as necessary.
Aperture: Set to the widest (fastest) possible to allow the most light and fast shutter speeds, adjusted with the Front Dial. (Using dials on camera is generally faster than turning the aperture ring on a long telephoto lens)
Custom Buttons: C1 for face/eye subject selector, C2 focus area: expanded focus area tracking, and C3 for toggling face/eye priority in AF.
Rear Right Dial: assigned for exposure compensation (standard function)
Control Wheel: white balance, ensuring quick adjustments on the fly.
Center Button: move focus point to the middle
Joystick (Multi-selector): Configured for AF/MF hold for quick focus mode changes.
White Balance: Auto, to let the camera intelligently adjust to the natural lighting conditions.
ISO: Auto, to dynamically adapt to changing light but keep an eye on noise levels.
Focus Mode: Continuous AF for keeping moving subjects in focus.
AF Tracking Sensitivity: Set to standard (3) to maintain focus on moving animals.
Autofocus Priority: Balanced emphasis in AF-C mode
Drive Mode: Continuous shooting HI+ (10 fps) to capture sequences of action.
In-Body Image Stabilization (IBIS): Enabled to reduce camera shake, but do not forget to switch off when use tripod
Viewfinder/Monitor Selection: Set to manual viewfinder preference. Shoot and also check the images without leaving the viewfinder
Review Time: Auto review turned off to maintain focus on the subject.
By saving these settings as a camera custom profile, you create a reliable baseline for fieldwork. This configuration allows you to swiftly adjust to the nuances of light, environment, and wildlife movement. For instance, capturing the serene motion of a deer at dusk could begin with these settings at an example (auto) ISO 8000 sensitivity, but a simple adjustment on the rear left dial might reduce the shutter speed to 1/60, lowering the ISO to 1250 as the deer pauses, resulting in a crisper, cleaner image. One can swiftly adjust the exposure compensation by simply turning the nearby rear right dial, should the background be too bright or dark relative to the subject. After making a few adjustments to suit the scene, you can easily switch back to your familiar settings with a quick twist out and back of the mode dial, setting you up perfectly for your next photographic venture.
Once you've settled into your shooting position, it's effective to employ consecutive short bursts of 4-8 continuous exposures. This technique captures a sequence of shots, documenting subtle variations in the animal's posture. Among these frames, you can then select the most captivating pose that truly embodies the essence of the moment. However, consider this: although taking thousands of sequential photos costs nothing in the digital age, selecting the very best from the multitude can require a tremendous effort.
It can be quite convenient to carry a lightweight, low-profile tripod attached to one's belt, enabling comfortable shooting from prone, seated, or kneeling positions without having to support the weight of a heavy camera setup. Carrying approximately a 2x3 metre camouflage net in a belt carry bag is practical, as it allows for the rapid setup of a hide when needed.


White lens covered by camo tape as put on a light tripod for low level shooting; using camo net as a quick hide (mobile photos)
Mastering the art of photographing red deer in the wild is a challenging endeavour. Bear in mind, the essence of photography lies in the balance of preparation and the ability to adapt to the moment. With these settings as your foundation, you are well-equipped to capture the beauty of wildlife in its most authentic form.

Tenderness (Sony A7III, Sony FE 200-600 F5.6-6.3 G OSS [@600mm], 1/250, f/6.3, ISO 25600, 8:56pm in Jun)
Final Thoughts
As you apply these tips, remember to respect the wildlife and their habitat. Your presence should be as a silent observer, not a disruptor. With time, patience, and practice, you will find that wildlife photography is not just about the images captured but the connection formed with nature. Share your stories and successes with us, and may your ventures into the wild be as rewarding as the images you seek to capture.